Search this Blog

Thursday, 23 August 2012

Fresh and Beautiful Search Boxes to Blog

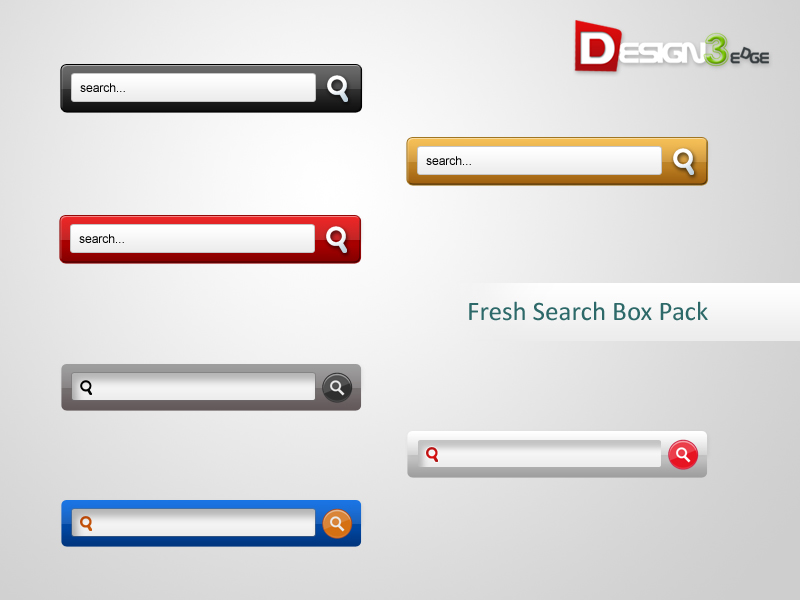
Fresh and Beautiful Search boxes to your blogger blogs. i given asimple search box widget. here i giving six beautiful and fresh search box to you. Actually these are PSD source designed byDesign3edge. i am converted to Blogger for you. hope you enjoyed with this!.


HOW TO ADD BEAUTIFUL SEARCH BOXES TO BLOGGER
  1. Login to Blogger Dashboard -> Design tab -> Page Elements .
  2. Click on Add a Gadget where you wish to place Search Box.
  3. Choose HTML/JavaScript from the List.
  4. Place any one Search Box code in to it and Save the Gadget.
Style 1

<style type="text/css">
#w2b-searchbox{background:url(https://blogger.googleusercontent.com/img/b/R29vZ2xl/AVvXsEiUMNUtuccvkbhTwrRjnKsuysQxRzYlRCOP_dy_FC4aVqo03OgZWHywDOs_YnpFs0XT5hoiHwghDNEsd1Gt1y19PNJ-u0RkIKjBQUUQLrgFexoO5hp7nhsoV_bWoGBeZg6EhMt9uF2ElRTB/) no-repeat scroll center center transparent;width:307px;height:50px;disaply:block;}
form#w2b-searchform{display: block;padding: 10px 12px;margin:0;}
form#w2b-searchform #s{padding: 6px;margin:0;width: 235px;font-size:14px;vertical-align: top;border:none;background:transparent;}
form#w2b-searchform #sbutton{margin:0;padding:0;height:30px;width:30px;vertical-align: top;border:none;background:transparent;}
</style>   
<div id="w2b-searchbox">
<form id="w2b-searchform" action="/search" method="get">
    <input type="text" id="s" name="q" value="Search..." onfocus='if (this.value == "Search...") {this.value = ""}' onblur='if (this.value == "") {this.value = "Search...";}'/>
    <input type="image" src="http://img1.blogblog.com/img/blank.gif" id="sbutton" />
</form>
</div>
Style 2

<style type="text/css">
#w2b-searchbox{background:url(https://blogger.googleusercontent.com/img/b/R29vZ2xl/AVvXsEjKRsZdnEPmHsWL9opW9ne_rFFX8ase6VL_BwTQq8x1tFz6AApiydkGbPtT-XwmZmJD2gBr0Cdj3Mc5H84sWDNOV-8aXWfPLaaEo_qnbBmwU3ogN9LJzai-YPIfwSgOsNZBI_M9ZK7XGZB5/) no-repeat scroll center center transparent;width:307px;height:50px;disaply:block;}
form#w2b-searchform{display: block;padding: 10px 12px;margin:0;}
form#w2b-searchform #s{padding: 6px;margin:0;width: 235px;font-size:14px;vertical-align: top;border:none;background:transparent;}
form#w2b-searchform #sbutton{margin:0;padding:0;height:30px;width:30px;vertical-align: top;border:none;background:transparent;}
</style>   
<div id="w2b-searchbox">
<form id="w2b-searchform" action="/search" method="get">
    <input type="text" id="s" name="q" value="Search..." onfocus='if (this.value == "Search...") {this.value = ""}' onblur='if (this.value == "") {this.value = "Search...";}'/>
    <input type="image" src="http://img1.blogblog.com/img/blank.gif" id="sbutton" />
</form>
</div>
Style 3


<style type="text/css">
#w2b-searchbox{background:url(https://blogger.googleusercontent.com/img/b/R29vZ2xl/AVvXsEj5RjRTEecMaPe7-5r1tmYdUYWoUEtI6qAbVMetWlN4A5O6G1v419PKd-agv7kmhAbIyx-nKcLCb88II2sUdbrSLGQNgxoT0-3Qlr1_w6KxhJKnSyBGI192mM-co9sKljEfltdzV3eonFz_/) no-repeat scroll center center transparent;width:307px;height:50px;disaply:block;}
form#w2b-searchform{display: block;padding: 10px 12px;margin:0;}
form#w2b-searchform #s{padding: 6px;margin:0;width: 235px;font-size:14px;vertical-align: top;border:none;background:transparent;}
form#w2b-searchform #sbutton{margin:0;padding:0;height:30px;width:30px;vertical-align: top;border:none;background:transparent;}
</style>   
<div id="w2b-searchbox">
<form id="w2b-searchform" action="/search" method="get">
    <input type="text" id="s" name="q" value="Search..." onfocus='if (this.value == "Search...") {this.value = ""}' onblur='if (this.value == "") {this.value = "Search...";}'/>
    <input type="image" src="http://img1.blogblog.com/img/blank.gif" id="sbutton" />
</form>
</div>
Style 4

<style type="text/css">
#w2b-searchbox{background:url(https://blogger.googleusercontent.com/img/b/R29vZ2xl/AVvXsEjjIkYRU58t3NX7_J3ePsnlIIVrAT-uoWC7NwYRN7gs9atzziiSPV0ZN0OEgd2bfXsxwTG0_PT3zTmhQaOSDXhtoI1QKATxHnEmVTzYWLRwMMQDNL7eCLIOT_GLKrRD0Gr8yCNfEzD9dXTD/) no-repeat scroll center center transparent;width:307px;height:50px;disaply:block;}
form#w2b-searchform{display: block;padding: 12px;margin:0;}
form#w2b-searchform #s{padding: 6px 6px 6px 26px;margin:0;width: 215px;font-size:14px;vertical-align: top;border:none;background:transparent;}
form#w2b-searchform #sbutton{margin:0;padding:0;height:30px;width:30px;vertical-align: top;border:none;background:transparent;}
</style>   
<div id="w2b-searchbox">
<form id="w2b-searchform" action="/search" method="get">
    <input type="text" id="s" name="q" value=""/>
    <input type="image" src="http://img1.blogblog.com/img/blank.gif" id="sbutton" />
</form>
</div>
Style 5
search box style5
<style type="text/css">
#w2b-searchbox{background:url(https://blogger.googleusercontent.com/img/b/R29vZ2xl/AVvXsEgBPfUjpy0Zl3EzfhBLsjbqkdrPnrVU1Tum8BQQchtyIvNzpCBIolBMeMBxghp2kPvBkeWgU21XoaJIJR2ObjfRXh-9cuOxHePLQPjkrDq96zLPa9T9EXcaXHuoZQSYN3Y0NjuKfiZWBkZw/) no-repeat scroll center center transparent;width:307px;height:50px;disaply:block;}
form#w2b-searchform{display: block;padding: 12px;margin:0;}
form#w2b-searchform #s{padding: 6px 6px 6px 26px;margin:0;width: 215px;font-size:14px;vertical-align: top;border:none;background:transparent;}
form#w2b-searchform #sbutton{margin:0;padding:0;height:30px;width:30px;vertical-align: top;border:none;background:transparent;}
</style>   
<div id="w2b-searchbox">
<form id="w2b-searchform" action="/search" method="get">
    <input type="text" id="s" name="q" value=""/>
    <input type="image" src="http://img1.blogblog.com/img/blank.gif" id="sbutton" />
</form>
</div>
Style 6
search box style6
<style type="text/css">
#w2b-searchbox{background:url(https://blogger.googleusercontent.com/img/b/R29vZ2xl/AVvXsEgGA7l5dj17nEta3PU_85CwTk_x8c7B61pJYJk26xqNoblfeCwtRse0KF4zYgrNVg-PNYm1KKLk0ODtMIij83cS5xyVWRvodwOB2TNDZFyd317b6vLHtPMP5D_LgziHlWfqwr7cJXlowz-G/) no-repeat scroll center center transparent;width:307px;height:50px;disaply:block;}
form#w2b-searchform{display: block;padding: 12px;margin:0;}
form#w2b-searchform #s{padding: 6px 6px 6px 26px;margin:0;width: 215px;font-size:14px;vertical-align: top;border:none;background:transparent;}
form#w2b-searchform #sbutton{margin:0;padding:0;height:30px;width:30px;vertical-align: top;border:none;background:transparent;}
</style>   
<div id="w2b-searchbox">
<form id="w2b-searchform" action="/search" method="get">
    <input type="text" id="s" name="q" value=""/>
    <input type="image" src="http://img1.blogblog.com/img/blank.gif" id="sbutton" />
</form>
</div>
Thanks
Continue Reading "Fresh and Beautiful Search Boxes to Blog"

Add an image to Blogger Post Title


By default, Blogger's post title is a plain text. In this tutorial, I'll show you how you can add an image beside your post title.

So let's begin... 

Step 1:

First thing first you have to do is to prepare an image. After that you'll need a direct link to an image before you proceed further. You can upload it to tinypic.com and copy the URL located in the Direct Link for Layouts box. Also, make sure your image is sized appropriately. You don't want to see a huge image next to your post title.

Step 2:
  • If you're using the old Blogger interface: Go to Dashboard - Design - Edit HTML - Expand Widget Template (don't forget to make a backup)
  • If you're using the new Blogger interface: Go to Dashboard - Template - Edit HTML - Proceed - Expand Widget Template (don't forget to make a backup)
After that, find (CTRL + F) and delete the following code:

<b:includable id='post' var='post'>
  <div class='post hentry'>
    <a expr:name='data:post.id'/>
    <b:if cond='data:post.title'>
      <h3 class='post-title entry-title'>
      <b:if cond='data:post.link'>
        <a expr:href='data:post.link'><data:post.title/></a>
      <b:else/>
        <b:if cond='data:post.url'>
          <b:if cond='data:blog.url != data:post.url'>
            <a expr:href='data:post.url'><data:post.title/></a>
          <b:else/>
            <data:post.title/>
          </b:if>
        <b:else/>
          <data:post.title/>
        </b:if>
      </b:if>
      </h3>
    </b:if>

The code to be deleted:

blogger blogspot, image near title, how to

Step 3:

Paste the following code in the place (be careful when replacing) of the deleted code in Step 2:

<b:includable id='post' var='post'>
  <div class='post hentry'>
    <a expr:name='data:post.id'/>
    <b:if cond='data:post.title'>
    <table><tr>
     <td class='ssybyposttitle'>
      <img src='https://blogger.googleusercontent.com/img/b/R29vZ2xl/AVvXsEiJ9YP2FIH7F649xrCXfSV_INk2YfD8f-U8Iy8jaBlMxDkxgM5Dui-r2zlxsBPvmTprIEv9QaVkDKpahQkDaMkfhMkCU5Pww0cq_tbEC8y_U4IC4iXYzHgWSFqS3XiFUmJi4tXcCrFiu2EZ/s1600/icon.png'/></td>
     <td><h3 class='post-title entry-title'>
      <b:if cond='data:post.link'>
        <a expr:href='data:post.link'><data:post.title/></a>
      <b:else/>
        <b:if cond='data:post.url'>
          <b:if cond='data:blog.url != data:post.url'>
            <a expr:href='data:post.url'><data:post.title/></a>
          <b:else/>
            <data:post.title/>
          </b:if>
        <b:else/>
          <data:post.title/>
        </b:if>
      </b:if>
      </h3>
     </td>
    </tr></table>
     <style>
       h3.post-title {
       margin: 0px !important;
       }
     </style>
    </b:if>

Step 4: 

Now, replace the image address in red line above with that of your image (the one that you've gotten from Step 1).

Step 5: Save the Template.
Continue Reading "Add an image to Blogger Post Title"

Add Related Post To Blogger with Thumbnail

Now here is a wonderful hack for displaying related posts beneath each of your blog posts, along with thumbnails. The related articles are chosen from other posts in that same category/label/tag. With this hack many of your readers will remain on your site for longer periods of time when they see related posts of interest.


Steps adding the Related Posts Widget to Blogger/Blogspot

Step 1. Go To Blogger Dashboard >>Design >>Edit HTML;

Step 2. Check the "Expand widgets template" box; 

Step 3. Search (CTRL + F) for this piece of code:

</head>

Step 4. Copy and paste the below code just before/above </head>:

<!--Related Posts with thumbnails Scripts and Styles Start-->
<!-- remove --><b:if cond='data:blog.pageType == &quot;item&quot;'>
<style type="text/css">
#related-posts {
float:center;
text-transform:none;
height:100%;
min-height:100%;
padding-top:5px;
padding-left:5px;
}

#related-posts h2{
font-size: 1.6em;
font-weight: bold;
color: black;
font-family: Georgia, &#8220;Times New Roman&#8221;, Times, serif;
margin-bottom: 0.75em;
margin-top: 0em;
padding-top: 0em;
}
#related-posts a{
color:black;
}
#related-posts a:hover{
color:black;
}

#related-posts  a:hover {
background-color:#d4eaf2;
}
</style>
<script type='text/javascript'>
var defaultnoimage="https://blogger.googleusercontent.com/img/b/R29vZ2xl/AVvXsEi7S586S_AytpS4pwQXcSwnRaZw8JZT_FGsR6unKWhWPvRMS1_UUWp3zXOLJPXVT_p19ZhKghs3UZlHOtOwIdj6kBQG-i5ENy5L0V1SgWvR7oSVzp3niug7R1Wyh2yfpbyW6XNtM3RfO2EU/s1600/noimage.png";
var maxresults=5;
var splittercolor="#d4eaf2";
var relatedpoststitle="Related Posts";
</script>
<script src='http://helplogger.googlecode.com/svn/trunk/related-posts-with-thumbnails-for-blogger.js' type='text/javascript'/>
<!-- remove --></b:if>
<!--Related Posts with thumbnails Scripts and Styles End-->

Note:
-to change the default picture when no images are available, replace the URL in blue with your own.
-for displaying more than 5 posts, replace 5 value from "var maxresults=5;"
-remove the code in violet if you want the related posts to be displayed in homepage too

Step 5. Now find the following code:

<div class='post-footer-line post-footer-line-1'>

If you can't find it, then search for this one:

<p class='post-footer-line post-footer-line-1'>

OR:

<data:post.body/>

Step 6. Copy and paste the below code just after any of these lines

<!-- Related Posts with Thumbnails Code Start-->
<!-- remove --><b:if cond='data:blog.pageType == &quot;item&quot;'>
<div id='related-posts'>
<b:loop values='data:post.labels' var='label'>
<b:if cond='data:label.isLast != &quot;true&quot;'>
</b:if>
<script expr:src='&quot;/feeds/posts/default/-/&quot; + data:label.name + &quot;?alt=json-in-script&amp;callback=related_results_labels_thumbs&amp;max-results=6&quot;' type='text/javascript'/></b:loop>
<script type='text/javascript'>
removeRelatedDuplicates_thumbs();
printRelatedLabels_thumbs(&quot;<data:post.url/>&quot;);
</script>
</div><div style='clear:both'/>
<!-- remove --></b:if>
<b:if cond='data:blog.url == data:blog.homepageUrl'><b:if cond='data:post.isFirstPost'>
<a href='http://helplogger.blogspot.com'><img alt='Best Blogger Tips' src='https://blogger.googleusercontent.com/img/b/R29vZ2xl/AVvXsEhRrmjaL9Z1zDqx7cpVLTSWu3mBBr41g5t-5_-bXz0g3wf6juDJGjmVXvs2Jjtvg0xBxkxPiOfHrMVmwe6acPcf12qd7F3bY-994ffrJdFZe8pQm59BZPvRvJuvtsucTkbye-bsVOtNUsQw/s1600/best+blogger+tips.png'/></a>
</b:if></b:if>
<!-- Related Posts with Thumbnails Code End-->

Note: - change the 6 value from max-results=6 with the number of posts you want to be displayed.
- If you want the related posts to be displayed on homepage too, remove the code in violet.

Step 7. Save the Template

That's it 
Continue Reading "Add Related Post To Blogger with Thumbnail"

Wednesday, 22 August 2012

Add Link Hover/NUDGING EFFECT TO BLOGGER LINKS USING CSS


This tutorial will show you How To Add Link Hover/Nudging Effect To Blogger Links Using Css. After adding this effect in your blog all links or selected links slide when someone move there mouse over it. This effect makes your links more attractive.


LINK NUDGING DEMO


ADD NUDGING EFFECT TO ALL BLOGGER LINKS


  • Go to Blogger Dashboard --> Design --> Edit HTML
  • Backup your Template before making any changes to your blog
  • Now  Expand Widget Templates
  • Find the code shown below using [ctrl+F]


]]></b:skin>


  • Now Paste the Code shown below just before/above it


a:link {
-webkit-transition: padding-left 250ms ease-out;  -moz-transition: padding-left 250ms ease-out;
}
a:hover {
padding-left: 12px;}

ADD NUDGING EFFECT TO SELECTED LINKS

  • Go to Blogger Dashboard --> Design --> Edit HTML
  • Backup your Template before making any changes to your blog
  • Now  Expand Widget Templates
  • Find the code shown below using [ctrl+F]


]]></b:skin>


  • Now Paste the Code shown below just before/above it


.latesthack {
-webkit-transition: padding-left 250ms ease-out;  -moz-transition: padding-left 250ms ease-out;
}
.latesthack:hover {
padding-left: 12px;}

  • Now use the HTML code shown below to add nudging effect to selected links

<a class="latesthack" href=" http://awaisedition.blogspot.com/ ">Software And Tricks Home</a>
Continue Reading "Add Link Hover/NUDGING EFFECT TO BLOGGER LINKS USING CSS"

Multi Color Link Hover Effect


Sometimes you see that  when you get mouse pointer on a link than link change its colour like Rain bow.It is due To java script coding.
You can also put this coding on your blog,wordpress or any website.
And
To add this Flashing Link you can also get effect to your blogs.

1.Go To Layout > Edit HTML
2.Search For </head>
3.And just above </head> paste the code below,      


<script type='text/javascript'>
//<![CDATA[
var rate = 20;
if (document.getElementById)
window.onerror=new Function("return true")
var objActive;  // The object which event occured in
var act = 0;    // Flag during the action
var elmH = 0;   // Hue
var elmS = 128; // Saturation
var elmV = 255; // Value
var clrOrg;     // A color before the change
var TimerID;    // Timer ID
if (document.all) {
    document.onmouseover = doRainbowAnchor;
    document.onmouseout = stopRainbowAnchor;
}
else if (document.getElementById) {
    document.captureEvents(Event.MOUSEOVER | Event.MOUSEOUT);
    document.onmouseover = Mozilla_doRainbowAnchor;
    document.onmouseout = Mozilla_stopRainbowAnchor;
}
function doRainbow(obj)
{
    if (act == 0) {
        act = 1;
        if (obj)
            objActive = obj;
        else
            objActive = event.srcElement;
        clrOrg = objActive.style.color;
        TimerID = setInterval("ChangeColor()",100);
    }
}

function stopRainbow()
{
    if (act) {
        objActive.style.color = clrOrg;
        clearInterval(TimerID);
        act = 0;
    }
}

function doRainbowAnchor()
{
    if (act == 0) {
        var obj = event.srcElement;
        while (obj.tagName != 'A' && obj.tagName != 'BODY') {
            obj = obj.parentElement;
            if (obj.tagName == 'A' || obj.tagName == 'BODY')
                break;
        }
        if (obj.tagName == 'A' && obj.href != '') {
            objActive = obj;
            act = 1;
            clrOrg = objActive.style.color;
            TimerID = setInterval("ChangeColor()",100);
        }
    }
}

function stopRainbowAnchor()
{
    if (act) {
        if (objActive.tagName == 'A') {
            objActive.style.color = clrOrg;
            clearInterval(TimerID);
            act = 0;
        }
    }
}

function Mozilla_doRainbowAnchor(e)
{
    if (act == 0) {
        obj = e.target;
        while (obj.nodeName != 'A' && obj.nodeName != 'BODY') {
            obj = obj.parentNode;
            if (obj.nodeName == 'A' || obj.nodeName == 'BODY')
                break;
        }
        if (obj.nodeName == 'A' && obj.href != '') {
            objActive = obj;
            act = 1;
            clrOrg = obj.style.color;
            TimerID = setInterval("ChangeColor()",100);
        }
    }
}

function Mozilla_stopRainbowAnchor(e)
{
    if (act) {
        if (objActive.nodeName == 'A') {
            objActive.style.color = clrOrg;
            clearInterval(TimerID);
            act = 0;
        }
    }
}

function ChangeColor()
{
    objActive.style.color = makeColor();
}

function makeColor()
{
    // Don't you think Color Gamut to look like Rainbow?
    // HSVtoRGB
    if (elmS == 0) {
        elmR = elmV;    elmG = elmV;    elmB = elmV;
    }
    else {
        t1 = elmV;
        t2 = (255 - elmS) * elmV / 255;
        t3 = elmH % 60;
        t3 = (t1 - t2) * t3 / 60;
        if (elmH < 60) {
            elmR = t1;  elmB = t2;  elmG = t2 + t3;
        }
        else if (elmH < 120) {
            elmG = t1;  elmB = t2;  elmR = t1 - t3;
        }
        else if (elmH < 180) {
            elmG = t1;  elmR = t2;  elmB = t2 + t3;
        }
        else if (elmH < 240) {
            elmB = t1;  elmR = t2;  elmG = t1 - t3;
        }
        else if (elmH < 300) {
            elmB = t1;  elmG = t2;  elmR = t2 + t3;
        }
        else if (elmH < 360) {
            elmR = t1;  elmG = t2;  elmB = t1 - t3;
        }
        else {
            elmR = 0;   elmG = 0;   elmB = 0;
        }
    }
    elmR = Math.floor(elmR).toString(16);
    elmG = Math.floor(elmG).toString(16);
    elmB = Math.floor(elmB).toString(16);
    if (elmR.length == 1)    elmR = "0" + elmR;
    if (elmG.length == 1)    elmG = "0" + elmG;
    if (elmB.length == 1)    elmB = "0" + elmB;
    elmH = elmH + rate;
    if (elmH >= 360)
        elmH = 0;
    return '#' + elmR + elmG + elmB;
}
//]]>
</script>
You can change the value of var rate = 20. 
This controls the speed with which links change color.
That’s All!
Preview Your Templates To see The New Change.

Thanks

Continue Reading "Multi Color Link Hover Effect"