Search this Blog

Showing posts with label Bloging. Show all posts

Wednesday, 29 August 2012

How Visitors Listen Your Blogger Post

Today i will learn to you How your reader can listen your Blogger posts.This is a simple method.which is provided by Vozme
Your reader have a option to listen your blog post.
So lets start
First Step ...
First Go To vozMe 
Click on " Add speech to your website "
Scroll Down See " Template For Blogger "
Select Your Favorite one
using a text link
using an image and a text link
And Set Voice " Male /Female " As You Wish
Copy Code (Save in Notepad)


Next Step .....
Sign in Blogger Account
Click on " Design " Tab

Click on " Edit Html "

Check on " Expand Widget Templates "


Press Ctrl + F & Search This & Past Code Below and Paste it Just After (Save in Notepad)
                                                    <div class='post-header-line-1'/>


Save Template & Mission Complete
Refresh Your Blog & See Result


Continue Reading "How Visitors Listen Your Blogger Post"

Tuesday, 28 August 2012

Add Numbered Page Nav Widget With DIfferent Styles For Blog

Add Numbered Page Navigation Widget With DIfferent Styles For Blogger / Blogspot
Page navigation widget for blogger is most popular widget, and most bloggers are using this. because these players are only provided in the word press blogs hosted or blogs.But now his trick has been made ​​available to bloggers is also here that I am giving this Page Navigation Widget with different styles and options for full customization


How To Install This Widget On Blogger :-

Customize the Given Options and Click on Generate button
Click Add to Blogger button to add this widget on your Blog


Stylish Numbered Page Navigation Widget with Colored Styles For Blogger


Numbered Page Navigation Widget is a JavaScript hack for blogger to easily navigate blogger pages. In this post i am giving stylish navigation with different colorful styles.

An error was found in some blogs and it is also fixed in this widget.
eg.hiding at top


How To Install This Widget On Blogger :-

Click the below Button
  1. Customize the Options given in Widget form
  2. Click on "Generate" Button
  3. Finally click On "Add To Blogger" Button


How to Add Numbered Page Navigation Widget for Blogger / Blogspot


Page navigation is awesome widget that allows navigation of page number to the visitors. You might have seen numbered page navigation in many WordPress blogs. It is simple JavaScript that allows your older posts, new posts and links to the house numbers. Have you seen older posts, new messages and links at home bored.


How To Add Numbered Page Navigation Widget to Blogger Blog?

I am giving best customizing options to this widget

Note:-Choose colors for your convenience you feel good.

1.Customize Options in Widget Form
2.Click on Generate Button
3.Then finally Click on Add to Blogger Button to add as a Widget


If you have any Question or problem please share into comment section.i will try best to solve oyur problems.
Thanks

Continue Reading "Add Numbered Page Nav Widget With DIfferent Styles For Blog"

Saturday, 25 August 2012

Automatic Read More Hack For Blogger With Thumbnail

Automatic Read More Hack For Blogger With Thumbnails i.e expandable post hack for blogger with thumbnail of image used in blogger posts and all this work is done by the script automatically,you just dont need to locate your image the script will do all work for you automatically.Just you have to write your post and publish it with one image in post related to post.

If you dont want to add thumbnail image in post summary then i had an post previously on automatic read more hack for blogger,read this.

Now how to install Automatic Read More Hack For Blogger With Thumbnails Demo snapshot is below.

Lets start with its installation:-


Now Login to Blogger Go to Layout > Edit HTML in your Blogger dashboard and check the "expand widget templates" box.

Find the closing </head> tag in your blog template, and paste the following section of code immediately before it:


<script type='text/javascript'>var thumbnail_mode = "no-float" ;
summary_noimg = 430;
summary_img = 340;
img_thumb_height = 100;
img_thumb_width = 120;
</script>
<script type='text/javascript'>
//<![CDATA[
function removeHtmlTag(strx,chop){
if(strx.indexOf("<")!=-1)
{
var s = strx.split("<");
for(var i=0;i<s.length;i++){
if(s[i].indexOf(">")!=-1){
s[i] = s[i].substring(s[i].indexOf(">")+1,s[i].length);
}
}
strx = s.join("");
}
chop = (chop < strx.length-1) ? chop : strx.length-2;
while(strx.charAt(chop-1)!=' ' && strx.indexOf(' ',chop)!=-1) chop++;
strx = strx.substring(0,chop-1);
return strx+'...';
}

function createSummaryAndThumb(pID){
var div = document.getElementById(pID);
var imgtag = "";
var img = div.getElementsByTagName("img");
var summ = summary_noimg;
if(img.length>=1) {
imgtag = '<span style="float:left; padding:0px 10px 5px 0px;"><img src="'+img[0].src+'" width="'+img_thumb_width+'px" height="'+img_thumb_height+'px"/></span>';
summ = summary_img;
}

var summary = imgtag + '<div>' + removeHtmlTag(div.innerHTML,summ) + '</div>';
div.innerHTML = summary;
}


//]]>
</script>


Note in above codes we can change the numeric numbers according to our need

summary_noimg = 430; is post cut height without image
summary_img = 340; is post cut height with image
img_thumb_height = 100; is thumbnail image height
img_thumb_width = 120; is thumbnail image width

Now find this code <data:post.body/> in your template and replace it with below codes.


<b:if cond='data:blog.pageType == &quot;static_page&quot;'><br/>
<data:post.body/>
<b:else/>

<b:if cond='data:blog.pageType != "item"'>

<div expr:id='"summary" + data:post.id'><data:post.body/></div>
<script type='text/javascript'>createSummaryAndThumb("summary<data:post.id/>");
</script> <span class='rmlink' style='float:right;padding-top:20px;'><a expr:href='data:post.url'> read more "<data:post.title/>"</a></span>

</b:if>
<b:if cond='data:blog.pageType == "item"'><data:post.body/></b:if>
</b:if>


Preview Your template if its showing thumbnail with read more hack Save it.

To show thumbnail it should have one image in your blogger posts and please upload the .js file to your server and dont forget to change the link with yours in codes to make this hack work.

I am sure everybody will love this hack for sure.
Continue Reading "Automatic Read More Hack For Blogger With Thumbnail"

Add Drop Shadows to Images and Expand them on Mouse Hover


CSS is a fun thing to play with. With the growing development of cascading style sheet and with the accepting compatibility of new browsers, web designing is becoming more and more creative. We once used Photoshop to manually add drop shadows to images but now thanks to CSS3 you can add drop shadows to all your images automatically. We will learn today how to minimize the size of large images and how can we make them expand to their original size on mouse hover. I am sure you will love it :)
Please see a demo first,


Live Demo

How To add Drop Shadows and Enlarge Images on Mouse Hover?

The methods are really simple.
  1. Go to Blogger > Design > Edit HTML
  2. Back up your template
  3. Search for ]]></b:skin>
  4. Just above ]]></b:skin> paste the following code,
.MBT-CSS3 img{
-webkit-transform:scale(0.7); /*Webkit 0.7 times the original Image size*/
-moz-transform:scale(0.7); /*Mozilla 0.7 times the original Image size*/
-o-transform:scale(0.7); /*Opera 0.7 times the original Image size*/
-webkit-transition-duration: 0.5s; /*Webkit: Animation duration*/
-moz-transition-duration: 0.5s; /*Mozilla Animation duration*/
-o-transition-duration: 0.5s; /*Opera Animation duration*/
opacity: 0.5;
margin: 0 10px 5px 0;
}
.MBT-CSS3 img:hover{
-webkit-transform:scale(1.1); /*Webkit: 0.5 times the original Image size*/
-moz-transform:scale(1.1); /*Mozilla 0.5 times the original Image size*/
-o-transform:scale(1.1); /*Opera 0.5 times the original Image size*/
box-shadow:0px 0px 30px gray;
-webkit-box-shadow:0px 0px 30px gray;
-moz-box-shadow:0px 0px 30px gray;
opacity: 1;
}

If you wish to further decrease the image size then decrease 0.7 or if you wish to further fade the image then decrease 0.5
You are almost done. Now when ever you want the image to appear with this effect, simply use this code,
<div class="MBT-CSS3">
<img src="Image URL Goes Here" />
</div>

Upload your image to Blogger editor and replace Image URL Goes Here with your image link. You are done. Now visit your blog to see the effect working in action and yell out Bravo! :P
If you wish to add this effect to another image just keep on adding <img src="Image URL Goes Here" /> before </div>
This effect is compatible with latest versions of Mozilla, Safari, Opera, Chrome and as usual not that effective with boring IE. I just hope you liked it.

Continue Reading "Add Drop Shadows to Images and Expand them on Mouse Hover"

Thursday, 23 August 2012

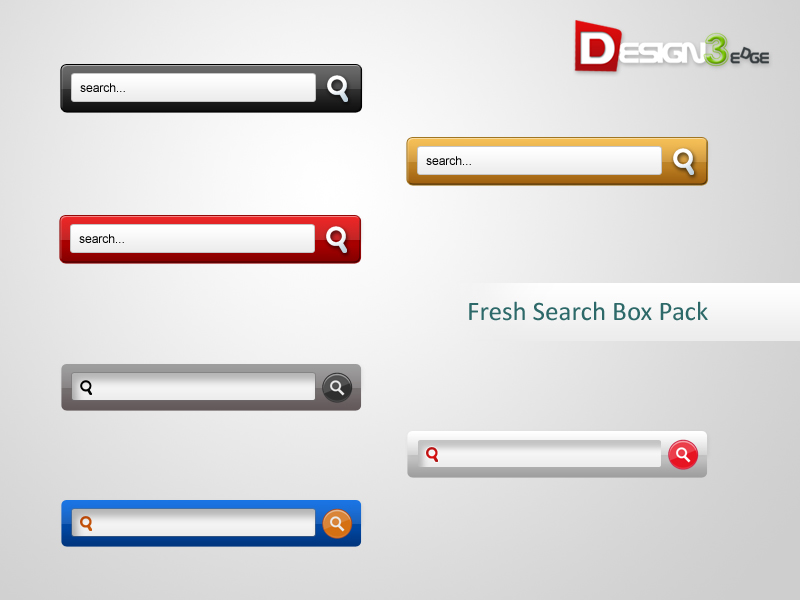
Fresh and Beautiful Search Boxes to Blog

Fresh and Beautiful Search boxes to your blogger blogs. i given asimple search box widget. here i giving six beautiful and fresh search box to you. Actually these are PSD source designed byDesign3edge. i am converted to Blogger for you. hope you enjoyed with this!.


HOW TO ADD BEAUTIFUL SEARCH BOXES TO BLOGGER
  1. Login to Blogger Dashboard -> Design tab -> Page Elements .
  2. Click on Add a Gadget where you wish to place Search Box.
  3. Choose HTML/JavaScript from the List.
  4. Place any one Search Box code in to it and Save the Gadget.
Style 1

<style type="text/css">
#w2b-searchbox{background:url(https://blogger.googleusercontent.com/img/b/R29vZ2xl/AVvXsEiUMNUtuccvkbhTwrRjnKsuysQxRzYlRCOP_dy_FC4aVqo03OgZWHywDOs_YnpFs0XT5hoiHwghDNEsd1Gt1y19PNJ-u0RkIKjBQUUQLrgFexoO5hp7nhsoV_bWoGBeZg6EhMt9uF2ElRTB/) no-repeat scroll center center transparent;width:307px;height:50px;disaply:block;}
form#w2b-searchform{display: block;padding: 10px 12px;margin:0;}
form#w2b-searchform #s{padding: 6px;margin:0;width: 235px;font-size:14px;vertical-align: top;border:none;background:transparent;}
form#w2b-searchform #sbutton{margin:0;padding:0;height:30px;width:30px;vertical-align: top;border:none;background:transparent;}
</style>   
<div id="w2b-searchbox">
<form id="w2b-searchform" action="/search" method="get">
    <input type="text" id="s" name="q" value="Search..." onfocus='if (this.value == "Search...") {this.value = ""}' onblur='if (this.value == "") {this.value = "Search...";}'/>
    <input type="image" src="http://img1.blogblog.com/img/blank.gif" id="sbutton" />
</form>
</div>
Style 2

<style type="text/css">
#w2b-searchbox{background:url(https://blogger.googleusercontent.com/img/b/R29vZ2xl/AVvXsEjKRsZdnEPmHsWL9opW9ne_rFFX8ase6VL_BwTQq8x1tFz6AApiydkGbPtT-XwmZmJD2gBr0Cdj3Mc5H84sWDNOV-8aXWfPLaaEo_qnbBmwU3ogN9LJzai-YPIfwSgOsNZBI_M9ZK7XGZB5/) no-repeat scroll center center transparent;width:307px;height:50px;disaply:block;}
form#w2b-searchform{display: block;padding: 10px 12px;margin:0;}
form#w2b-searchform #s{padding: 6px;margin:0;width: 235px;font-size:14px;vertical-align: top;border:none;background:transparent;}
form#w2b-searchform #sbutton{margin:0;padding:0;height:30px;width:30px;vertical-align: top;border:none;background:transparent;}
</style>   
<div id="w2b-searchbox">
<form id="w2b-searchform" action="/search" method="get">
    <input type="text" id="s" name="q" value="Search..." onfocus='if (this.value == "Search...") {this.value = ""}' onblur='if (this.value == "") {this.value = "Search...";}'/>
    <input type="image" src="http://img1.blogblog.com/img/blank.gif" id="sbutton" />
</form>
</div>
Style 3


<style type="text/css">
#w2b-searchbox{background:url(https://blogger.googleusercontent.com/img/b/R29vZ2xl/AVvXsEj5RjRTEecMaPe7-5r1tmYdUYWoUEtI6qAbVMetWlN4A5O6G1v419PKd-agv7kmhAbIyx-nKcLCb88II2sUdbrSLGQNgxoT0-3Qlr1_w6KxhJKnSyBGI192mM-co9sKljEfltdzV3eonFz_/) no-repeat scroll center center transparent;width:307px;height:50px;disaply:block;}
form#w2b-searchform{display: block;padding: 10px 12px;margin:0;}
form#w2b-searchform #s{padding: 6px;margin:0;width: 235px;font-size:14px;vertical-align: top;border:none;background:transparent;}
form#w2b-searchform #sbutton{margin:0;padding:0;height:30px;width:30px;vertical-align: top;border:none;background:transparent;}
</style>   
<div id="w2b-searchbox">
<form id="w2b-searchform" action="/search" method="get">
    <input type="text" id="s" name="q" value="Search..." onfocus='if (this.value == "Search...") {this.value = ""}' onblur='if (this.value == "") {this.value = "Search...";}'/>
    <input type="image" src="http://img1.blogblog.com/img/blank.gif" id="sbutton" />
</form>
</div>
Style 4

<style type="text/css">
#w2b-searchbox{background:url(https://blogger.googleusercontent.com/img/b/R29vZ2xl/AVvXsEjjIkYRU58t3NX7_J3ePsnlIIVrAT-uoWC7NwYRN7gs9atzziiSPV0ZN0OEgd2bfXsxwTG0_PT3zTmhQaOSDXhtoI1QKATxHnEmVTzYWLRwMMQDNL7eCLIOT_GLKrRD0Gr8yCNfEzD9dXTD/) no-repeat scroll center center transparent;width:307px;height:50px;disaply:block;}
form#w2b-searchform{display: block;padding: 12px;margin:0;}
form#w2b-searchform #s{padding: 6px 6px 6px 26px;margin:0;width: 215px;font-size:14px;vertical-align: top;border:none;background:transparent;}
form#w2b-searchform #sbutton{margin:0;padding:0;height:30px;width:30px;vertical-align: top;border:none;background:transparent;}
</style>   
<div id="w2b-searchbox">
<form id="w2b-searchform" action="/search" method="get">
    <input type="text" id="s" name="q" value=""/>
    <input type="image" src="http://img1.blogblog.com/img/blank.gif" id="sbutton" />
</form>
</div>
Style 5
search box style5
<style type="text/css">
#w2b-searchbox{background:url(https://blogger.googleusercontent.com/img/b/R29vZ2xl/AVvXsEgBPfUjpy0Zl3EzfhBLsjbqkdrPnrVU1Tum8BQQchtyIvNzpCBIolBMeMBxghp2kPvBkeWgU21XoaJIJR2ObjfRXh-9cuOxHePLQPjkrDq96zLPa9T9EXcaXHuoZQSYN3Y0NjuKfiZWBkZw/) no-repeat scroll center center transparent;width:307px;height:50px;disaply:block;}
form#w2b-searchform{display: block;padding: 12px;margin:0;}
form#w2b-searchform #s{padding: 6px 6px 6px 26px;margin:0;width: 215px;font-size:14px;vertical-align: top;border:none;background:transparent;}
form#w2b-searchform #sbutton{margin:0;padding:0;height:30px;width:30px;vertical-align: top;border:none;background:transparent;}
</style>   
<div id="w2b-searchbox">
<form id="w2b-searchform" action="/search" method="get">
    <input type="text" id="s" name="q" value=""/>
    <input type="image" src="http://img1.blogblog.com/img/blank.gif" id="sbutton" />
</form>
</div>
Style 6
search box style6
<style type="text/css">
#w2b-searchbox{background:url(https://blogger.googleusercontent.com/img/b/R29vZ2xl/AVvXsEgGA7l5dj17nEta3PU_85CwTk_x8c7B61pJYJk26xqNoblfeCwtRse0KF4zYgrNVg-PNYm1KKLk0ODtMIij83cS5xyVWRvodwOB2TNDZFyd317b6vLHtPMP5D_LgziHlWfqwr7cJXlowz-G/) no-repeat scroll center center transparent;width:307px;height:50px;disaply:block;}
form#w2b-searchform{display: block;padding: 12px;margin:0;}
form#w2b-searchform #s{padding: 6px 6px 6px 26px;margin:0;width: 215px;font-size:14px;vertical-align: top;border:none;background:transparent;}
form#w2b-searchform #sbutton{margin:0;padding:0;height:30px;width:30px;vertical-align: top;border:none;background:transparent;}
</style>   
<div id="w2b-searchbox">
<form id="w2b-searchform" action="/search" method="get">
    <input type="text" id="s" name="q" value=""/>
    <input type="image" src="http://img1.blogblog.com/img/blank.gif" id="sbutton" />
</form>
</div>
Thanks
Continue Reading "Fresh and Beautiful Search Boxes to Blog"