Search this Blog

Saturday, 25 August 2012

Automatic Read More Hack For Blogger With Thumbnail

Automatic Read More Hack For Blogger With Thumbnails i.e expandable post hack for blogger with thumbnail of image used in blogger posts and all this work is done by the script automatically,you just dont need to locate your image the script will do all work for you automatically.Just you have to write your post and publish it with one image in post related to post.

If you dont want to add thumbnail image in post summary then i had an post previously on automatic read more hack for blogger,read this.

Now how to install Automatic Read More Hack For Blogger With Thumbnails Demo snapshot is below.

Lets start with its installation:-


Now Login to Blogger Go to Layout > Edit HTML in your Blogger dashboard and check the "expand widget templates" box.

Find the closing </head> tag in your blog template, and paste the following section of code immediately before it:


<script type='text/javascript'>var thumbnail_mode = "no-float" ;
summary_noimg = 430;
summary_img = 340;
img_thumb_height = 100;
img_thumb_width = 120;
</script>
<script type='text/javascript'>
//<![CDATA[
function removeHtmlTag(strx,chop){
if(strx.indexOf("<")!=-1)
{
var s = strx.split("<");
for(var i=0;i<s.length;i++){
if(s[i].indexOf(">")!=-1){
s[i] = s[i].substring(s[i].indexOf(">")+1,s[i].length);
}
}
strx = s.join("");
}
chop = (chop < strx.length-1) ? chop : strx.length-2;
while(strx.charAt(chop-1)!=' ' && strx.indexOf(' ',chop)!=-1) chop++;
strx = strx.substring(0,chop-1);
return strx+'...';
}

function createSummaryAndThumb(pID){
var div = document.getElementById(pID);
var imgtag = "";
var img = div.getElementsByTagName("img");
var summ = summary_noimg;
if(img.length>=1) {
imgtag = '<span style="float:left; padding:0px 10px 5px 0px;"><img src="'+img[0].src+'" width="'+img_thumb_width+'px" height="'+img_thumb_height+'px"/></span>';
summ = summary_img;
}

var summary = imgtag + '<div>' + removeHtmlTag(div.innerHTML,summ) + '</div>';
div.innerHTML = summary;
}


//]]>
</script>


Note in above codes we can change the numeric numbers according to our need

summary_noimg = 430; is post cut height without image
summary_img = 340; is post cut height with image
img_thumb_height = 100; is thumbnail image height
img_thumb_width = 120; is thumbnail image width

Now find this code <data:post.body/> in your template and replace it with below codes.


<b:if cond='data:blog.pageType == &quot;static_page&quot;'><br/>
<data:post.body/>
<b:else/>

<b:if cond='data:blog.pageType != "item"'>

<div expr:id='"summary" + data:post.id'><data:post.body/></div>
<script type='text/javascript'>createSummaryAndThumb("summary<data:post.id/>");
</script> <span class='rmlink' style='float:right;padding-top:20px;'><a expr:href='data:post.url'> read more "<data:post.title/>"</a></span>

</b:if>
<b:if cond='data:blog.pageType == "item"'><data:post.body/></b:if>
</b:if>


Preview Your template if its showing thumbnail with read more hack Save it.

To show thumbnail it should have one image in your blogger posts and please upload the .js file to your server and dont forget to change the link with yours in codes to make this hack work.

I am sure everybody will love this hack for sure.
Continue Reading "Automatic Read More Hack For Blogger With Thumbnail"

Add Drop Shadows to Images and Expand them on Mouse Hover


CSS is a fun thing to play with. With the growing development of cascading style sheet and with the accepting compatibility of new browsers, web designing is becoming more and more creative. We once used Photoshop to manually add drop shadows to images but now thanks to CSS3 you can add drop shadows to all your images automatically. We will learn today how to minimize the size of large images and how can we make them expand to their original size on mouse hover. I am sure you will love it :)
Please see a demo first,


Live Demo

How To add Drop Shadows and Enlarge Images on Mouse Hover?

The methods are really simple.
  1. Go to Blogger > Design > Edit HTML
  2. Back up your template
  3. Search for ]]></b:skin>
  4. Just above ]]></b:skin> paste the following code,
.MBT-CSS3 img{
-webkit-transform:scale(0.7); /*Webkit 0.7 times the original Image size*/
-moz-transform:scale(0.7); /*Mozilla 0.7 times the original Image size*/
-o-transform:scale(0.7); /*Opera 0.7 times the original Image size*/
-webkit-transition-duration: 0.5s; /*Webkit: Animation duration*/
-moz-transition-duration: 0.5s; /*Mozilla Animation duration*/
-o-transition-duration: 0.5s; /*Opera Animation duration*/
opacity: 0.5;
margin: 0 10px 5px 0;
}
.MBT-CSS3 img:hover{
-webkit-transform:scale(1.1); /*Webkit: 0.5 times the original Image size*/
-moz-transform:scale(1.1); /*Mozilla 0.5 times the original Image size*/
-o-transform:scale(1.1); /*Opera 0.5 times the original Image size*/
box-shadow:0px 0px 30px gray;
-webkit-box-shadow:0px 0px 30px gray;
-moz-box-shadow:0px 0px 30px gray;
opacity: 1;
}

If you wish to further decrease the image size then decrease 0.7 or if you wish to further fade the image then decrease 0.5
You are almost done. Now when ever you want the image to appear with this effect, simply use this code,
<div class="MBT-CSS3">
<img src="Image URL Goes Here" />
</div>

Upload your image to Blogger editor and replace Image URL Goes Here with your image link. You are done. Now visit your blog to see the effect working in action and yell out Bravo! :P
If you wish to add this effect to another image just keep on adding <img src="Image URL Goes Here" /> before </div>
This effect is compatible with latest versions of Mozilla, Safari, Opera, Chrome and as usual not that effective with boring IE. I just hope you liked it.

Continue Reading "Add Drop Shadows to Images and Expand them on Mouse Hover"

Friday, 24 August 2012

ObjectDock 2.0


ObjectDock is a program that adds a skinnable dock to your Windows desktop. It is one of the most popular desktop enhancement programs available.
ObjectDockâ„¢ is a program that enables users to organize their shortcuts, programs and running tasks into an attractive and fun animated Dock. By allowing users to have more control over how they organize their desktop, users can take control of their desktop icons and shortcuts to have them be available when where and how they need them. This, all with the unique style and top-rate performance that ObjectDock is known to deliver!
In constant development, ObjectDock and ObjectDock Plus are enhanced often to provide the most unique features of any stylized shortcut organizer / launcher available.

Continue Reading "ObjectDock 2.0"

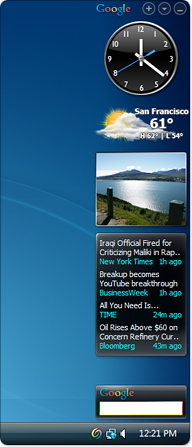
Google Desktop 5.9.1005.12 latest


Google Desktop makes searching your computer as easy as searching the web with Google. It's a desktop search application that provides full text search over your email, files, music, photos, chats, Gmail, web pages that you've viewed, and more. By making your computer searchable, Desktop puts your information easily within your reach and frees you from having to manually organize your files, emails and bookmarks.
Google Desktop doesn't just help you search your computer; it also helps you gather new information from the web and stay organized with gadgets and sidebar. Google Gadgets can be placed anywhere on your desktop to show you new email, weather, photos, personalized news, and more. Sidebar is a vertical bar on your desktop that helps you keep your gadgets organized.
Other features include:
  • Quick search box
  • Smart indexing
  • Multiple file types
  • Find deleted files
  • Deskbar and floating deskbar
  • Lock search
  • Microsoft Outlook integration             

Continue Reading "Google Desktop 5.9.1005.12 latest"

E-Speaking: Control Your PC Through Your Voice


An easy software solution to enable you to control your computer, dictate emails and letters, and have the computer read documents back to you. e-Speaking – Voice Recognition software using your voice to command and control your computer. Reduce or eliminate mouse clicks or keyboard input. Use it to enhance your computing experience by providing an additional input to the computer.

10 Reasons for Trying e-Speaking’s Software
1. Free Download of software
2. Over 100 commands built-in
3. Ability to add more commands
4. Runs in Windows2000 and Windows XP
5. Small file size
6. Utilizes latest technologies from Microsoft
7. Seamlesly integrate with Office
8. Voice commands of Mouse events
9. Based on SAPI and .NET technologies
10. Easy to Use

What is Speech Recognition & Voice Recognition?


These are exciting technologies that change the way you interact with your computer. Now you can speak to your computer and it can speak back. The speech that you and your computer exchange is scripted. In other words, you can’t just ask your computer how he/she is feeling? Rather, you can talk to your computer using a set of pre-defined commands and instructions (i.e., a script). Your computer will respond in the same way (also using a scripted language). For example, you can say: “File Open”, and the computer would respond: “Select the file”. Or you can say: “Edit Find” and the computer would ask:“Find What?”.


Continue Reading "E-Speaking: Control Your PC Through Your Voice"